


 English (pdf)
 Article in xml format
 Article references
 Send this article by e-mail
 Cited by SciELO
  Similars in
SciELO
Similars in
SciELO 
 Permalink
Introduction
Restorative dentistry faces new challenges in adopting emerging technologies related to dental materials and in meeting patients’ demands for esthetic non-metallic restoration of posterior teeth (1). Currently available choices of nonmetallic materials for such restorations includes direct and indirect resin composite and porcelain/ceramic restorations 1) (2. With the increasing in the clinical success of such alternative restorative materials, the use of metallic restorations in the posterior teeth is declining over time (1,2).
Recent innovations in adhesive systems and ceramics technology have enabled the fabrication of ultraconservative bonded restorations that are biologically compatible (2) with improved esthetics and increased strength 3. Indirect adhesive restorations allow dental professionals to re-establish the function, shape and contour of the teeth, to replicate color, to achieve natural light transmission, and to recapture strength and aesthetics through conservative adhesive tooth preparation designs (1, 2,4).
Ceramic Fundamentals
Ceramics are formed by the union of metallic and nonmetallic elements (1-2, 4-5). Most ceramic materials are oxides, which are compounds that are formed by the combination of oxygen with metals and semimetals such as aluminum, calcium, silicon, and magnesium 5. Porcelain is a type of ceramic used extensively in dentistry among other industries 5.
The first porcelain ceramics used in the eighteenth century were made of 25% feldspar, 25% quartz and 50% of kaolinite 6. Through years, porcelain had decreased (<10%) its kaolinite composition (4), classifying the material as dental ceramics 6.
Dental ceramics are essentially oxide-based glass-ceramic systems. They possess three essential features; ease fabrication of complex shapes, sufficient mechanical and corrosion resistance, and aesthetic appeal 5. The basic composition of dental ceramics is a mixture of natural raw minerals, as feldspar, quartz and kaolin, with aggregation of inorganic chemicals, mainly metal oxides obtained by sintering (5,6). Most of these materials have a biphasic structure, consisting of a crystalline phase surrounded by a glassy matrix phase with an amorphous structure 5. The glassy matrix phase consists of networks of silica and feldspar (K2O-Al2O3-6SiO2) and of a crystalline phase, formed by crystalline nuclei not incorporated into the matrix, acting as a framework for reinforcement 2) (4.
Feldspathic ceramics
The earliest successful porcelain systems used conventional feldspathic porcelain derived from feldspar, a natural mineral (5). The basic composition of feldspathic porcelain is a mixture of feldspar, potash, quartz and kaolinite (5-6). Feldspar comprises up to 65% of the mix, followed by quartz (25%) and metal oxides (10%) (5-6). Sodium oxide and alkaline earth oxides are added as bivalent glass modifiers to improve translucent properties and maintain strenght (5). An increased volume of fine leucite particles is also used in dental ceramics in order to increase fracture strength (1-2, 5-6).
The complex structure of this type of ceramic is composed by a glazed glass matrix, which allows adaptation of the thermal expansion coefficient (TEC), in order to increase resistance, reduce fractures and maintain control of residual thermal contraction (RTC) (6). Thus, this glass matrix involves quartz crystals that remain unchanged. The crystalline phases act as a ceramic reinforcement, enhancing the physical properties of color, reflection, refraction and fluorescense 7. Moreover, crystalline phases increased the mechanical properties of ceramics by reducing the propagation of microfractures (6).
Feldspathic ceramics presents desirable intrinsic properties, which resembles tooth nature beauty, and provides aesthetic results that meet the expectations of professionals and patients. However, conventional feldspathic ceramics are prone to tension and flexion, but much more resistant to compression (2,4). As a general rule, the higher the glass content, the better the optical properties of the material-though the mechanical properties may be diminished 8. Thus, different techniques, mechanisms and systems were developed to improve the properties of ceramic materials, reducing the potential for subcritical crack propagation and fractures on areas of high masticatory stress 8.
IPS Empress® Esthetic System
The IPS-Empress system was developed at the University of Zurich, Zurich, Switzerland, in 1983 (1). Ivoclar Vivadent took over the development project in 1986 and presented it to the dental community in 1991(3). The material used in the IPS Empress® system is a leucite-reinforced castable glass ceramic designed primarily for single-unit restorations 1) (3) (9. According to the manufacturer, it is appropriate for fabrication of inlays, onlays, crowns and veneers.
Empress® contains leucite crystals which are produced by means of controlled crystallization in a special glass containing nucleating agents 4), (10. Restorations are formed using the lost-wax process and hotpressing (4, 10). Because only one shade can be included in a single pressing, porcelains have to be handcrafted to create further gingival and enamel colors with IPS Empress® Universal shades/Stains (7, 10, 11).
The main advantage of the IPS-Empress® system is that through the injection-moulding process, which involves the use of heat and pressure, the leucite crystals incorporated in the material create barriers that counteract the buildup of the tensile stresses that predispose to formation of microcracks (1,3,6,7). Thus, the added leucite crystals improve flexural strength and fracture resistance through so-called dispersion strengthening (1). The crystals act as “roadblocks” in preventing crack propagation, so that the restoration does not undergo catastrophic failure during function (1). The strength of this material is similar to 50% aluminous core porcelain with strengths of approximately 160-180 MPa (9).
The basic constituent of IPS-Empress® is feldspathic porcelain, consisting of 63% silicon dioxide and 19% aluminum oxide, in which the leucite crystals are added (1). The material is available in the form of glass-ceramic ingots presintered by the manufacturer. During fabrication of an IPS Empress restoration a mould is made of a wax-up of the restoration according to the lost-wax technique. A glass-ceramic ingot is placed in the Empress furnace and pressed with an aluminum oxide plunger into a preheated muffle. A temperature of 1200°C is required to achieve the plasticity phase of the ceramic material necessary to ensure proper pressing and adaptation (1, 3, 8-10). When the casting procedure is complete, divesting follows, and there are two techniques for finishing the restoration and reproducing the desired color characteristics. One option is the shading technique, whereby the restoration is first made in the neutral shade of an ingot (3, 8, 9) (11. A heavily pigmented characterization color is then added and glazed to a thickness of 50 to 60 μm. The second option is the layering technique, whereby a casting that conforms to the dentinal portion of the restoration is made of a dentin-shade ingot. Then, the enamel layer is added in increments of 0.3 mm thickness (1). The layering technique is typically used in the fabrication of crowns to ensure optimum esthetics, whereas the shading technique is typically used in the fabrication of inlays and onlays (1).
According to Brochu and El-Mowafy (1) just three studies evaluated for five years or more the performance and longevity of IPS Empress® onlay and/or inlay. Those studies involved a total of 376 restorations and survival rates ranged from 96% at 4.5 years to 91% at 7 years 1) (12) (13.
This case presentation exemplifies the use of IPS Empress® Esthetic (Ivoclar Vivadent, Schaan, Liechtenstein) for the preparation of an onlay restoration.
Case presentation
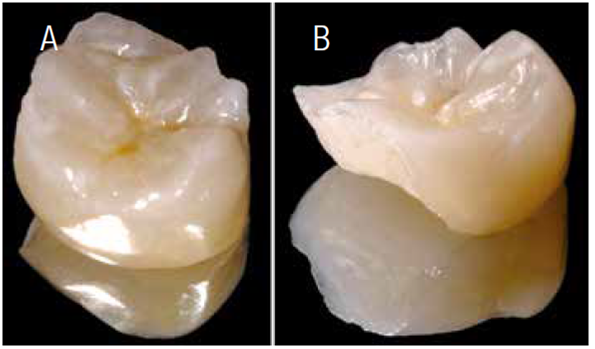
A 25 year-old female patient presented to the dental clinic. The maxillary right first molar presented a large failing restoration (Figure 1). Radiographic evaluation revealed an acceptable endodontic treatment.
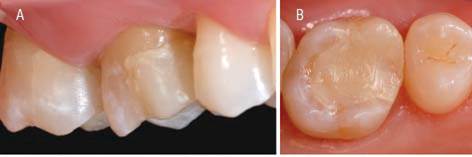
Figures 1A & 1B. Vestibular and occlusal aspect of 1.6 tooth with temporary restoration of composite resin after endodontic treatment.
A work model was performed for patient’s preoperative occlusal patterns analysis and treatment planning 14. The amount of buccal and palatal tooth remaining associated with the absence of deleterious occlusal habits lead the authors to plan a metal-free, IPS Empress® Esthetic onlay restoration.
The first step was the removal of the previous restoration using an n°3332 diamond bur (KG Sorensen, Barueri, SP, Brazil). Once all the restoration was removed, the remaining cusps and tooth structures were evaluated for potential area of weakness (Figure 2). Then, was decided to fill some areas of the pulpal wall with composite resin. Moreover, in the mesial-proximal box was observed the inflammation of the gingival tissue. Thus, was decided to perform a laboratorial temporary restoration.
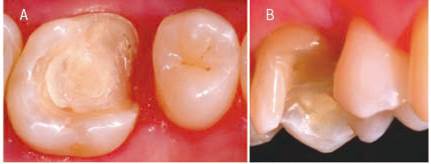
Figures 2A & 2B Photomicrograph after the elimination of the composite resin and pre-definition of the cavity preparation.
An immediate temporary restoration was fabricated with the aid of a pre-formed metal matrix (Palodent System, San Mateo, CA, EUA), wedges and a onlay light-curing composite resin (Palodent System, San Mateo, CA, EUA). The cementation of the restoration was performed with free-eugenol temporary cement (Provicol, Cuxhaven, Germany) (Figure 3).
In the laboratorial procedure, the temporary restoration was performed adjusting the composite resin to the mesial-proximal box. This temporary restoration was used for 2 weeks in order to restrain gingival tissue inflammation. While the technician was performing the fabrication of the temporary restoration, a tooth bleaching was performed (Figure 4).
Figures 4A & 4B Restoration in composite resin, observe the marginal adaptation and the mesial contact.4C. Aspect of the temporary restoration adjusted and cemented, awaiting the accomplishment of the dental whitening.
The preparation design and convenience form were carried out considering the existing tooth conditions 14) (16. The 3131, 3131F and 3131FF Diamond burs (KG Sorensen, Barueri, SP, Brasil) were used for preparation design (Figure 5).
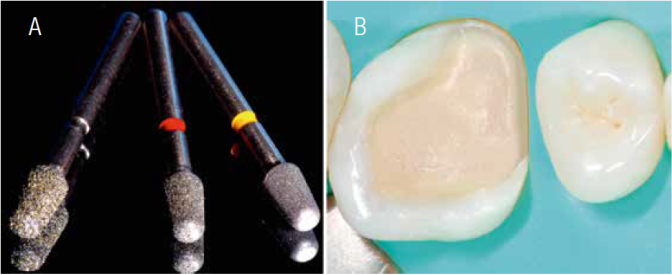
Figures 5A & 5B Diamond tips with the final characteristics of a cavity preparation for an Onlay ceramic restoration.
Enamel and dentin color selection was performed after removal of the provisory. In the IPS Empress® Esthetic system, the color is determined with the aid of Chromascop® scale (Ivoclar Vivadent, Schaan, Liechtenstein). For dentin and enamel substrates, a color guide 240 (ETC2) and 110 (ETC1) was selected, respectively. Digital photographs were sent to the dental technician, as additional information for the texture and translucency reproduction 17.
Afterward, rubber dam was placed and the preparation design and convenience form initiated. The occlusal preparation floor presented a V shape following the surface anatomy, and a 2.0 mm axial reduction was performed, in order to allow a uniform occlusal thickness (14,16). Passive insertion axis was determined by the inclination of the preparation walls 8)-(15. Additionally, the mesiobuccal cusp was reduced and flatted (4mm). Then, the preparation was refined. Any sharp internal line angles were removed, the pulpal and gingival floors were smoothed, and the bucco-palatal walls of the proximal box were finished. A butt joint was performed in all margins. (Figure 6)
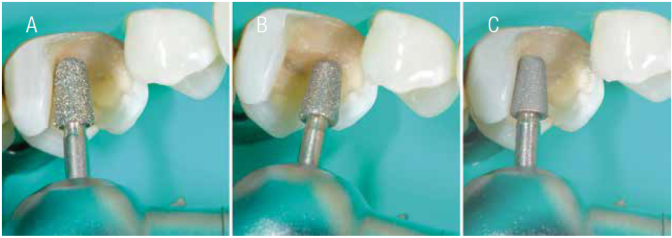
Figures 6A & 6B The specific diamond tips were used to define depth, expulsivity and rounding of the internal angles.6C. Note the axial pulp angle with rounded end.
Once the rubber dam was removed, the cavity preparation was rinsed thoroughly. Then, two retractor wires (n°000, n°1) were inserted into the gingival sulcus (Ultrapack®, Ultradent, Utah, EUA) (Figure 7a). Impressions were made with silicone material (Express®, 3M ESPE, Califórnia, EUA) (Figura7b). An impression of the mandibular arch was obtained with irreversible hydrocolloid (Palgat Plus Quick, ESPE 3M, Alemanha). The patient’s register bite was achieved with a silicone material (Empress®, 3M ESPE, Califórnia, EUA), in order to registered major centric stops.
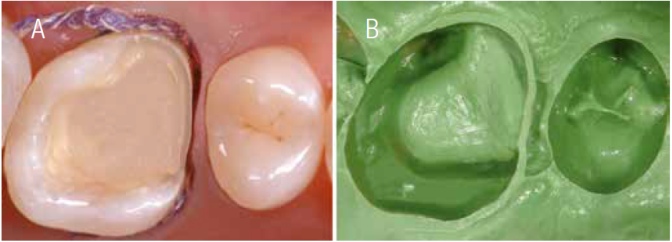
Figures 7A & 7B Double molding technique was used. Observe the rounded internal angles of the preparation and the final impression.
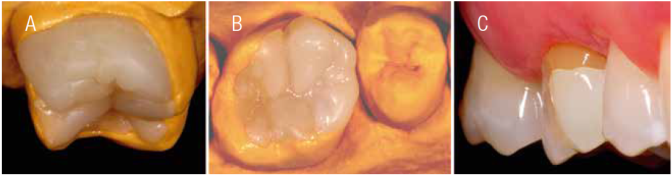
After the laboratory finishing procedure by the technician, the restoration was carefully evaluated in the work model, to check marginal adaptation, shape and shade (Figure 8). The internal surface of the restoration was conditioned with a 50 µm aluminum oxide jet for 10 s, cleaned with alcohol and dry by the technician 18 (Figure 9).
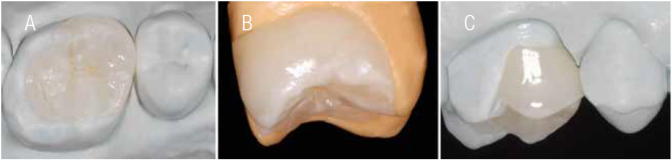
Figures 8A to 8C Onlay made with IPS EmpressR Esthetic system (Ivoclar Vivadent, Schaan, Liechtenstein). Detail of the ceramic restoration positioned in the master model and die cut model, evidencing the finishing line established in occlusal, cervical and vestibular restoration. The restoration was fabricated with specific dyes and two layers of glaze. Observe the anatomical characteristics.
Figures 9A & 9B Aspect of the ceramic part in different angles. Notice the difference between the external and internal surfaces of the restoration, presenting an opaque and roughened inner surface.
In the second session the temporary restoration was removed and the cavity preparation was cleaned with soda bicarbonate jet and rinsed thoroughly. The onlay was tested in for the evaluation of color, marginal adaptation and occlusion with the aid of an Accu-Fill II (Parkell, Farmingdale, NY, EUA) 19. Its interproximal contact was inspected and necessary equilibrations were made. Then, with Fit Checker (GC America, Alsip, IL, EUA) was tested the adaptation of the restoration (Figure 10).
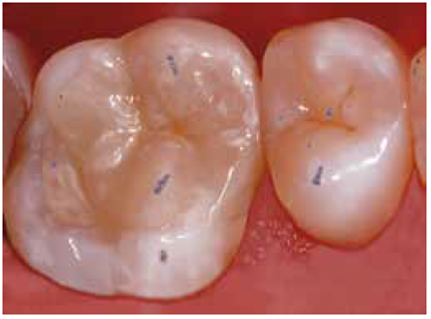
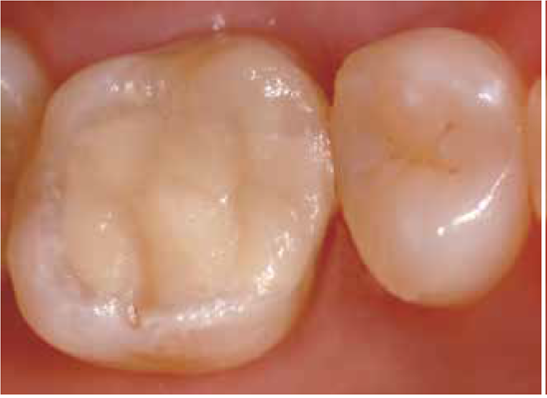
Figure 10 Occlusal view demostrating teeth contacts and ceramic restoration, showing a uniform distribution of contacts.
Subsequently, the tooth was isolated with a rubber dam to protect against contamination and to achieve adequate moisture control (Figure 11). The cavity preparation was cleaned with 2% chlorhexidine gluconate (Tubulicid Vermelho, Global Dental, SP, Brazil).

Figures 11A & 11B The ceramic restoration was analyzed again before cementation. Dehydration of the tooth is evident.
The internal aspect of the onlay was conditioned with 10% hydrofluoric acid for 1 minute. In order to avoid contamination of the ceramic surface, this procedure was performed including the ceramic restoration in a heavy silicone support (Figure 12).
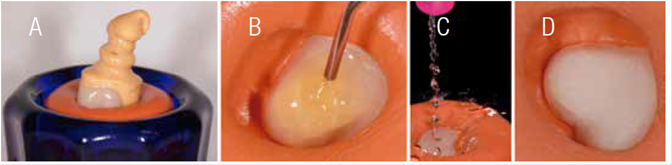
Figures 12A to 12D With the insertion of the ceramic piece into the silicone, the acid conditioning remains restricted to the specific areas for adhesion.
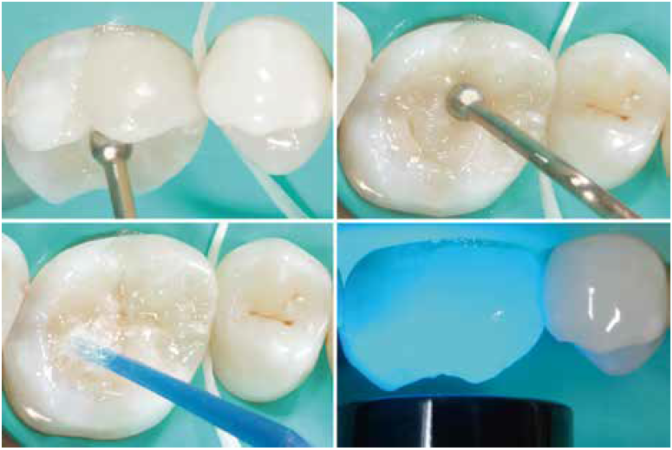
The tooth was prepared for bonding using a total-etch-technique 20)-(22 (Figure 13). The dental substrates were etched with 37% phosphoric acid for 30 seconds in enamel, and for 15 seconds on dentin. Then, the cavity preparation was rinse with an air-water spray and excess water was removed with a damp cotton pellet leaving the substrate slightly moist. Adper Scothbond MR Multi-Purpose Plus (3M ESPE, St Paul, MN, EUA) was applied on both substrates with a microbrush. First, the activator (n°1.5) was applied, followed by a slightly air spray for 5 seconds. Then, the primer (n°2) was used, followed by the catalyst (n°3.5). This adhesive system was selected, due to the used of a quimical initiator (benzoyl peroxide), which trigger the dual-polymerization reaction.
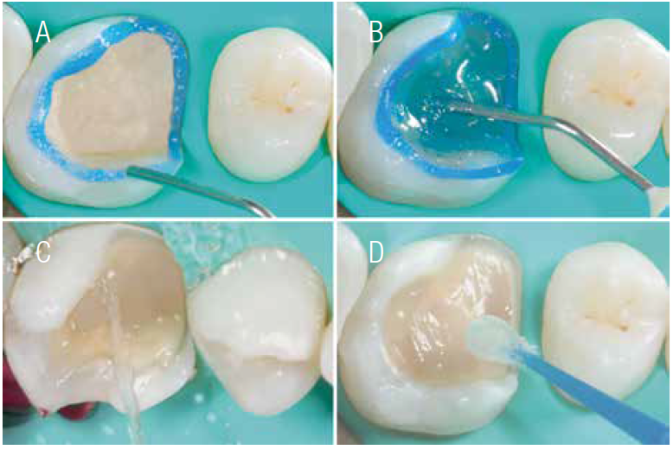
Figures13A to 13D. The adhesive protocol must be performed with extreme care, according to the indications of the materials used and the manufacturers' considerations. 13A and 13B. Acid conditioning of the tooth structure, a low suction cannula was used to remove the existing acid, being the best way to protect the adjacent teeth and antagonists after washing. 13D. The adhesive system used allows controlling the cementation time due to its activation only in the presence of the resin cement.
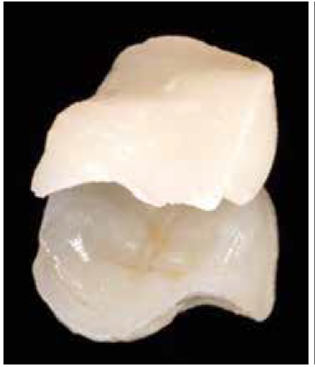
Figure 14 Ceramic restoration prior to cementation, with layers of silanizing agent and catalyst agent.
A silane coupling (RelyXTM Ceramic, 3M ESPE, St Paul, MN, EUA) was applied in the internal surface of the onlay restorations and dried for 5 seconds. The silane acted as a coupling agent between the filler particles on the ceramic surface and the resin cement. After silane application, a thin layer of catalyst was applied, prior the final cementation.
The restoration was cemented with a A1 dual-cured composite (RelyX™ ARC, 3M ESPE, St. Paul, MN, USA) 23), (24. The cement was placed simultaneously in the preparation and in the internal surface of the onlay. Then, the restoration was seated firmly in place, and the gross excesses of cement were removed with a microbrush and in the proximal areas with Super-floss (Oral B). Residual cement was leaved to prevent voids and to compensate the polymerization shrinkage of the cement. Glycerin was applied to all the margins in order to prevent the formation of an oxygen-inhibition layer on the resin cement. The restoration was polymerized with a JETLITE TM 2000 (J Morita, Irvine, CA, EUA) at 600 mW/cm2, from all aspects for 60 seconds 25 (Figure 15). Residual cement at the gingival margin was removed with a scalpel.
Figures 15A to 15D Figures 15 A & 15B. Insertion of the ceramic restoration accompanied by a metallic instrument, facilitating the best control and the pressure at the moment of the settlement. 15C and 15D. After removal of the excess cement, an antioxidant gel was applied to the periphery of the cementation line as a complement to the photopolymerization of the resin cement.
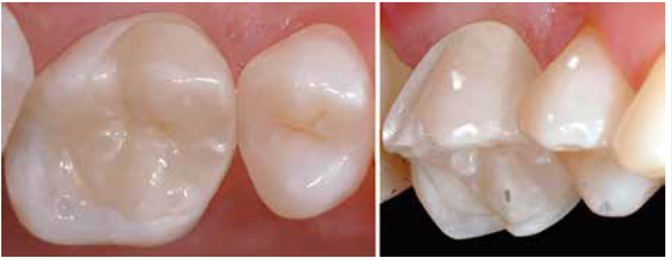
The rubber dam was removed and the patient was asked to first perform closure without force and then centric, protrusive, and lateral excursions. The contacts were tested with unwaxed floss and the margins were inspected. Final inspection revealed a harmonious integration of the onlay restoration with the existing tooth structure (Figure 16).
Conclusion
Since requests for aesthetic nonmetallic restorations in the posterior region continue to increase, clinicians are confronted with the need for a biomimetic restorative material, such as dental ceramics. The primary advantages of the onlay ceramic restoration are conservation of tooth structure, tooth reinforcement, durability and aesthetics. However, as with most restorative procedures, the final result is based on the scientific knowledge and clinical experience of the clinician and technician in creating an almost imperceptible biomimetic restoration.

