Introduction
Yttria-stabilized zirconia (Y-TZP), used for fixed dental prosthesis, might be altered by airborne-particle abrasion and grinding with rotary instruments. The former treatments are needed either for enhancing adhesion, or for adjusting the anatomy of the restoration. However, they also cause the formation of cracks in the material, phase transformation (tetragonal to monoclinic) as well as compressive or tensile stress that could lead to failure of the restoration (1, 2, 3).
Airborne-particle abrasion can be performed with particles of different sizes, and several studies have investigated its effect on strength (4, 5) as well as the phase transformation (6,7,8,9) of the sintered yttria-stabilized tetragonal zirconia. Grinding with rotary instruments, with and without irrigation, has also been studied, as this procedure is often employed for occlusal adjustments of the restorations (10, 11). The results of these studies are often inconclusive or contradictory, with some investigations stating that the material is toughened, while others report a decrease in strength.
Therefore, further research is necessary to enrich the scientific literature on dental zirconia.
Different methods are employed for studying the effects of surface treatments on zirconia. Among the most common ones are perfilometry for roughness assessment, bending and hardness tests (for fracture resistance and toughness measurement) and scanning electron microscopy (SEM) to analyze morphology and crystallite size (12).
Since Y-TZP is a polycrystalline ceramic, X-Ray diffraction (XRD) is commonly conducted to analyze the crystallographic configuration providing a better understanding of the effects of treatments on the crystallites of this material. X-Ray Diffraction is a non-destructive and specific technique enabling the detection of different phases in the zirconia (monoclinic, tetragonal and cubic) (12, 13). Typically, diffractograms produced by this method are qualitatively described by analyzing the presence and height of different peaks (Miller Indexes), indicating the presence of a cubic, tetragonal or monoclinic phase zirconia (12). However, there is a scarcity of literature on studies using XRD to mathematically assess the crystallite size of zirconia specimens after various surface treatments. Some authors suggest that zirconia grain size varies from 0,2 to 0,8µm (14), others report values around 1,7µm (15), and some indicate sizes up to 4,1µm (16).
Surface treatments that impact crystallite size influence both the appearance and resistance of the restoration. The grain size is correlated with translucency parameters and the strength of the material (14, 17). A smaller crystallite size is associated with higher strength and lower translu- cency due to increased light scattering at the grain boundaries (14, 16). Numerous studies analyze the effects of surface treatments on the crystallographic properties of conventional tetragonal zirconia. However, there is limited literature on new generations of highly translucent zirconia that often contain a significant amount of cubic zirconia (c-ZrO₂), making them more stable and prone to less transformation to monoclinic zirconia.
The present study utilized a mathematical model to determine the crystallite size of translucent zirconia through XRD. The objective was to investigate the effect of four different surface treatments on (1) the crystallite size, (2) surface roughness and (3) the generation of stress of translucent zirconia. The null hypothesis tested was that (1) there would be no difference in the zirconia crystallite size regardless of the surface treatment, (2) surface roughness would be the same for all surface treatments, and (3) no difference in compressive or tensile stress for all experimental groups.
Methods and materials
All materials employed in this study are listed in Table 1.
Table 1 Materials used in this study.
| Material | Manufacturer | Description | Lot |
|---|---|---|---|
| Katana UTML | Kuraray, Noritake | Zirconia, color EA1 | DOQCS |
| Zeta Sand 50µm | Zhermack | Al2O3 | 2374326 |
| Zeta Sand 110µm | Zhermack | Al2O3 | 2365304 |
| Komet Diamond 848 | Komet | Diamond coated Burs 107µm grit (medium) | 00319874 |
Specimen fabrication
In this study, a multilayered pre-sintered Y-TZP disc (Kuraray Noritake Katana Zirconia Ultra Translucent) with a diameter of 98.5mm and a thickness of 18mm was utilized. A diamond disk (35mm in diameter and 0.17mm in thickness) was employed under dry conditions and low speed to produce 50 specimens of pre-sintered zirconia measuring 18mm x 10mm x 1.8mm. Following the cutting process, the specimens underwent progressive polishing with 500, 400, and 2000 grit water sandpaper (3M).
Sintering was conducted in a dental furnace (Dekema Astromat 624). The samples were heated at a rate of 10°C/min, then held at 1550°C for two hours, and cooled at a rate of -10°C/min, following the manufacturer's instructions.
After sintering, the samples were randomly divided in 5 groups of ten specimens each (n=10) and received one of the surface treatments described in Table 2.
Table 2 Experimental groups.
| Group | Surface treatment |
|---|---|
| 1 | Sandblasting with 50µm Al2O3 |
| 2 | Sandblasting with 110µm Al2O3 |
| 3 | Grinding with irrigation |
| 4 | Grinding without irrigation |
| 5 | Control: As sintered |
Sandblasting was performed in groups 1 and 2 using the Microetcher II (Danville, Dental-Zest). The particles were air-blasted perpendicular to the specimen surface at a pressure of 2.8 bar and a distance of 10mm in a static manner. The impact angle between the nozzle tip and the specimen was 90°.
Grinding was carried out in groups 3 and 4, with and without water irrigation, using a high-speed turbine (Extratorque 506C, KAVO, Warthausen, Germany) and medium grit burs (Komet Dental). A custom device was designed for these surface treatments to standardize the position of the bur, the direction of grinding, as well as its rotating speed (5000rpm), and pressure (approximately 1 N) to ensure a reproducible grinding process on all samples.
Characterization
All specimens were scanned on the treated surface using an X-ray diffractometer (Panalytical Empyrean Alpha 1 diffractometer, Netherlands). XRD spectra were collected using CuKα1 radiation with a wavelength of 0.15406 Å (at 45 kV and 40 mA) over a 2θ range between 10° and 80° with a scanning step of 0.02°. Diffraction peaks, along with the assigned Miller indices, were: (111), (200), (220), (311), (222), and (400). Crystallite size was estimated using the modified Williamson- Hall (W-H) X-ray peak profile analysis, as described in the literature (18, 19).
For each Miller index, the Full Width at Half Maximum (FWHM) as well as its intensity were calculated using OriginPro 8.5® software. The estimation of the crystallite size was previously described by the authors elsewhere (19, 20). Since the manufacturer, as well as the literature, reports a high percentage of cubic-phase in the employed zirconia (15, 21), which means that the crystallite strain (ε) is isotropic, the total change in the diffrac- tion peaks is given by the following equation 1:
Where k is a constant shape factor (k=0.9); λ represents the wavelenght of theCuKα1 radiation (0.154056 nm); θhkl corresponds to the Bragg diffraction angle (in units of °), Dv is the crystallite size (in nm) and βhkl is the amplitude of the peak at half of its intensity (FWHM).
A plot for each experimental group was drawn as described by Venkateswarlu (18) with 4ε sinθhkl along the X-axis and βhkl cosθhkl along Y-axis. As a result, the crystallite size values were extracted from the intercepts of the linear fits.
For each Miller Index, the exact angle value was determined to calculate the angle difference in relation to the control group. A reduction in the angle of a given peak in an experimental group indicates the presence of compressive stress (an increase in the angle indicates the presence of tensile stress).
Surface roughness was measured on all specimens using a standard scanning perfilometer (Stylus Bruker DektakXT™) with a range of 65.5µm. The diameter of the point was 2µm with a constant force of 5mg. Three regions in three different directions were scanned on each speci- men, with a scanned length of 1500µm in every direction and a total duration of 40 seconds.
One specimen from each experimental group was analyzed using scanning electron micros- copy (S-3700N, HITACHI). A thin layer (0,5µm) of gold was used for coating, and the readings were carried out at 20kV accelerating voltage and a beam current of 144µA. The magnification was x100 and x1000.
Statistical tests were conducted at a signifi- cance level of α=0.05 using the SPSS v1 software package to determine if there was any statistically significant difference in the angle of the Miller indices among the experimental groups. Levene tests were performed to analyze if the samples had equal variances, and the Kolmogorov-Smirnov test was conducted to observe if the data had a normal distribution. In cases where the criteria were met, we applied an analysis of variance (ANOVA), and if the criteria were not met, we applied a non-parametric Kruskal Wallis test. Tukey Post Hoc tests were conducted for pairwise compari- sons. We also analyzed whether any statistically significant difference was observed between the groups in terms of surface roughness.
Results
Figure 1 illustrates an XRD spectra of one sample from the control group. The y-axis represents the intensity with which the signal was detected, whereas tehe x-axis corresponds to the reflected beam at an angle of 2-theta (2θ) where the signal was detected.
This classic peak pattern is equivalent to sintered zirconia, and every peak is marked with its Miller index (MI).
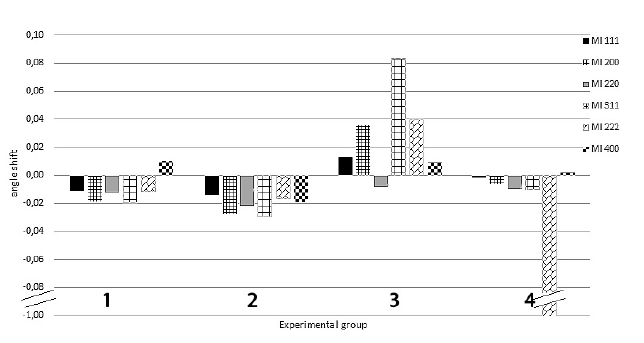
Figure 2 illustrates the shifts in the angle for each diffraction peak according to the experimental group. A general tendency toward a shift to a lower angle can be observed in the peaks of groups 1, 2, and 4, indicating the presence of compressive stress on the samples. Conversely, group 3 (grinding with irrigation) shows a tendency toward higher angles for most diffraction peaks, suggesting the presence of tensile stresses on the samples.
Kruskal-Wallis tests and ANOVA (where criteria were met) revealed statistically significant differences (p≤0.05). Pairwise comparisons using Tukey Post Hoc test for the angles corresponding to each Miller Index based on the experimental groups showed that there was no statistically significant difference between groups 1 and 2, whereas groups 3, 4 are significantly different from groups 1 and 2.
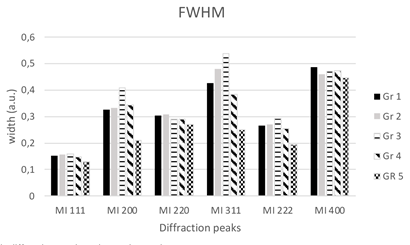
Figure 3 shows the behavior of the FWHM of the five experimental groups. A tendency towards an increase is observed in all groups that received a surface treatment, meaning there is a reduction in the crystallite size. The increase is lower for Group 1 in most of the peaks. Group 3 shows the strongest increase in the FWHM.
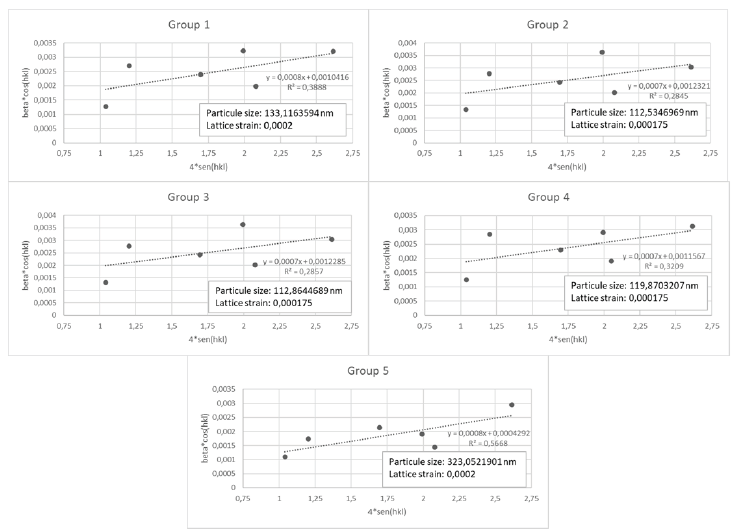
The Williamson-Hall profiles and the respective crystallite size calculation for each experimental group can be observed in Figure 4. The control group showed the highest crystallite size. All surface treatments provoked a reduction in the crystallite size, with the highest reduction in the Groups 2 and 3. Group 1 showed less transformation of the crystallite size.
Profilometry revealed the results as shown in Table 3. The control group exhibited the lowest average roughness, which was statistically different from all the other groups. The highest roughness was observed in group 4, which was not statistically different from group 3. ANOVA (p≤0,05) indicates that the average roughness was significantly affected by the surface treatments.
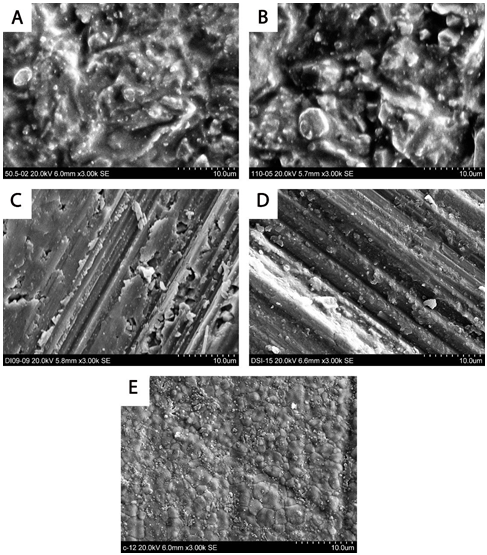
SEM images of one sample per each experimental group are displayed in Figure 5. A clear image of the crystallites is observed in the control group, whereas groups 1 and 2 show a non-homogenous surface with a crater-like appea- rance. Groups 3 and 4 depict the direction of the grinding process, with a tendency towards more pronounced grooves in group 4.
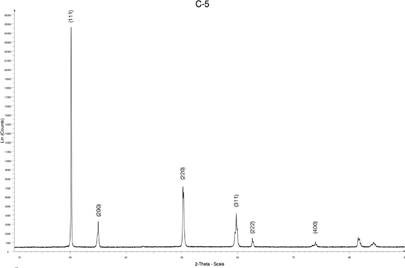
Figure 1 XRD spectra from the as-sintered Kuraray Noritake Katana Zirconia Ultra Translucent Y-TZP specimens.
Table 3 Average roughness in µm for each experimental group. Same letters indicate no statistically significant difference between the groups.
| Experimental Group | Mean (µm) | sig |
|---|---|---|
| 1 | 2.93 ᵇ | 0.000 |
| 2 | 2.02 ᵇ | - |
| 3 | 6.14 ᶜ | - |
| 4 | 6.57 ᶜ | - |
| 5 | 0.24 ͣ | - |
Discussion
The current study explored the crystallographic modifications in translucent zirconia following four common surface modifications using X-ray Diffraction and a quantitative analysis. The mathematical analysis proposed by Venkateswarlu (18) was deemed suitable for this research, given that the investigated material has a high concentration of cubic-phase zirconia.
According to Camposilvan (21), 30% of the weight of Katana UTML is in the cubic phase, while Inokoshi (15) and Kolakarnprasert (16) report around 70% of cubic phase in translucent zirco- nia. This implies that the studied ceramic has a refractive index with isotropic properties, exhibiting reduced scattering from birefringent grain boundaries (14).
The size of the crystallite in the untreated control group typically measured 323 nm, which is lower than the crystallite size described by some authors (15, 16, 22) but coincident with the size reported by other investigations (14,23). It must be emphasized that the grain size tends to be larger when sintering temperatures exceed 1700°C.
(23) Since our study followed the manufacturer's instructions for the regular sintering protocol, and the temperature reached 1550°C, this might explain a smaller crystallite size.
Crystallographic characterization revealed that sandblasting and grinding caused a reduction in the crystallite size. The crystallite size was particularly diminished in experimental groups 2 (sandblasting with 100µm particles), as well as both experimental groups where grinding was performed. Thus, the first null hypothesis was rejected.
The present research also uncovered a significant observation related to the shift in angles within the Miller indexes following the surface treatments. A shift towards a smaller angle for a given Miller index implies the presence of compressive stress in the specimen (24). Conversely, a shift towards a higher angle strongly suggests the existence of tensile stresses. In our study, all Miller indices in groups 1, 2, and 4 exhibited a shift towards smaller angles, indicating the occurrence of compressive stresses resulting from the surface treatments applied in these groups. This discovery aligns with the findings reported by Inokoshi (15), who identified the presence of residual compressive stresses in all highly translucent zirconias investigated. Further research is essential to better comprehend the impact of tensile and compressive stresses within zirconia specimens. The existing literature presents contradictions regarding the effects that surface treatments have on the ultimate fracture of samples (4). However, it is suggested that stress in zirconia could result in reduced resistance to low-temperature degradation (16). Hence, clinicians should always prefer surface treatments that enhance characteristics while maintaining lower risks of long-term damage to the material.
Regarding the roughness of the specimens, our study reported average values of 2-3µm for sandblasting and 6µm for grinding. A similar average roughness after sandblasting with 110µm Aluminium Oxide particles was described by Alao et al. (12), who also employed translucent zirconia. Interestingly in our study, specimens sandblasted with 50µm showed a higher mean average rough- ness, than the specimens sandblasted with bigger particles. However, this difference was not statistically significant. Our control group depicted an average roughness of 0,24µm, which coincides with the study of Alao (12) of the specimens pre-polished before sintering, which is also the methodology employed in our study. It is also worth adding that Inokoshi (15) detected that Katana UTML was the zirconia that was mostly affected by sandblasting procedures regarding surface rugosity.
Our study focused on multilayered zirconia specimens, despite the potential introduction of additional variables. We selected this material due to its relevance in exploring newly available materials with aesthetic impact. Additionally, Kolakarnprasert's study (16) demonstrated that the layers of multilayered zirconia mainly differed in pigment types and content, rather than significant variations in their crystallographic properties.
The present research supports the widely employed procedure of sandblasting the prosthetic intaglio to enhance the bonding of restorations (25), while causing minimal grain size transformation and introducing less compressive stress on the restorations.
Conclusions
Crystal domain size showed a tendency to decrease after the surface treatments. Sandblasting with 50µm alumina particles caused the least decrease in crystallite size.
Sandblasted samples, as well as ground samples without irrigation, exhibited compressive stress. Specimens that were subjected to grinding with irrigation exhibited tensile stress.
Sandblasted samples had lower surface roughness compared to the ground samples.
Author contribution statement
Conceptualization and design: T.V.K. Literature review: T.V.K. and J.S.V.
Methodology and validation: T.V.K.
Formal analysis: J.S.V and T.V.K.
Investigation and data collection: J.S.V.
Resources: University of Costa Rica.
Data analysis and interpretation: J.S.V and T.V.K.
Writing-review and editing: T.V.K.
Supervision: T.V.K.
Project administration: T.V.K.


